Requesting One-Time Payments in Bulk
Issuing multiple one-time invoices at once is only available on Professional and Enterprise plans. It is not available on the Essential plan. More information on our plans can be found here.
In This Article:
Batch invoicing is ideal for planners who want to bill AUM fees, new users who are getting set up, or clients who would prefer to manually approve their payments each month, quarter, etc.
One-time invoices can be created in bulk via an uploaded CSV file or by manually entering them from within AdvicePay.
To get started, you'll want to navigate to Invoices in the sidebar, click the ↓ button next to Request Payment, and select Request Multiple One-Time Payments.

Request Payments Manually
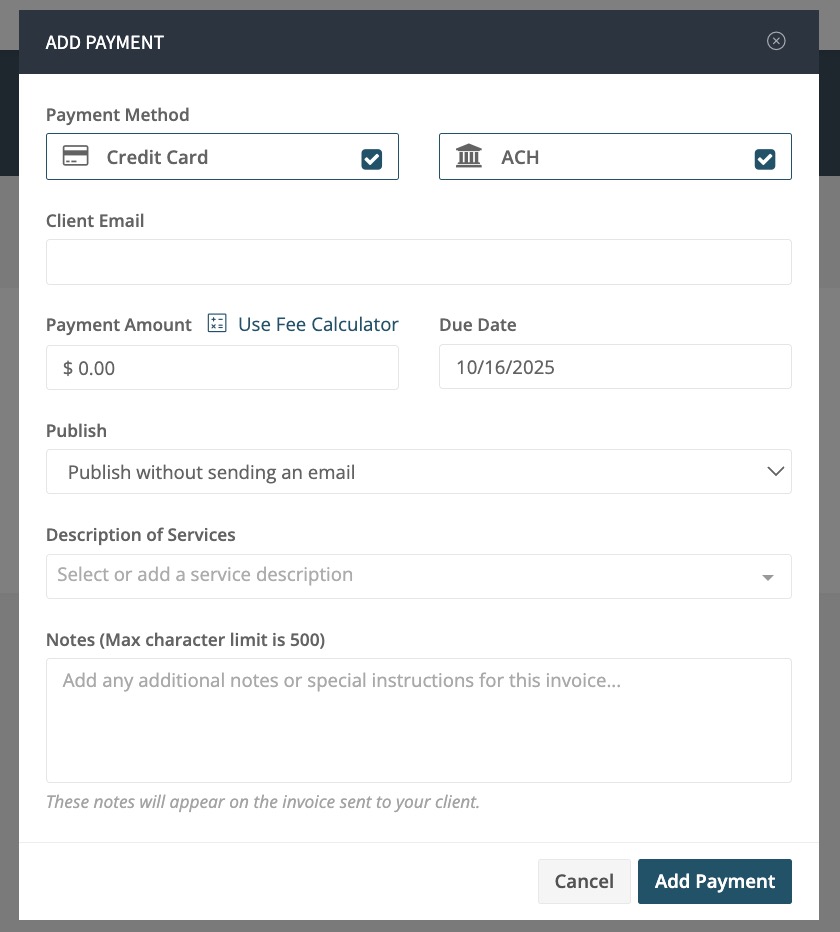
1. Select Request Payment Manually

Tip: If you are using a Windows computer, you may need to save the file as .txt instead of as a CSV due to how Windows sometimes handles file uploads. You can accomplish this by opening the file, going to File > Save As, and saving after making sure that the file name ends with .txt instead of .csv!
2. Fill out the invoice details.
Please note that the Client Email must match a client you have already added to your AdvicePay account!
3. Click Add Payment
4. Add additional invoices by selecting Add Payment Request and repeating steps 2 & 3 above.

5. If needed, attach a document for eSignature to an invoice by clicking the blue Add eSign Document link, selecting an existing template, and filling out any empty signee roles:

6. To edit or delete any invoice you've started to set up but haven't yet published, click the Edit or Remove buttons:

7. Click Finish to publish all invoices to your clients' accounts!
Under Publish, select whether you want to publish the invoice without notifying the client with an email or whether you want to send an email notice through AdvicePay upon publishing.
(Tip: this can be adjusted on the review screen before publishing.) If you choose to send an email notice through AdvicePay upon publishing, an email notification with each invoice will be sent immediately (regardless of due date).
Request Payments via .CSV
1. Select Request Payment via CSV

2. Download our ready-to-use payment request CSV template by clicking on the blue link. This template contains the exact fields we need to be able to import invoices into AdvicePay, so you don't need to change or adjust a thing!

3. In the template, enter your clients' Email (this must match a client already added to your AdvicePay account), invoice Amount, Due Date, Description, and allowed Payment Method (either, ach, or ccd -- with ccd representing credit or debit cards).

4. Save the template, then drag the file into the upload box. We will auto-magically "read" your file to make sure we have all the required info entered correctly. If there are any errors in the template, we'll let you know what needs to be fixed. If everything is good to go, you'll see a success message:

5. Click Review & Send
6. Add any additional invoices (if desired) by selecting Add Payment Request and manually entering the invoice details.
7. If needed, attach a document for eSignature to one or more invoices by clicking the blue Add eSign Document link, selecting an existing template, and filling out any empty signee roles:
8. To edit or delete any invoice you've started to set up but haven't yet published, click the Edit or Remove buttons:
9. Click Finish to publish all invoices to your clients' accounts!