Get Your Clients Started on AdvicePay + Issuing Invoices
Please note that if your firm has disabled advisor's ability to create clients, only the Account Owner, Full Access Advisors, and Admins can add a client.
Note that the Essential plan accounts can add up to 10 clients, while Professional and Enterprise accounts may add unlimited clients. Learn more about our plans here.
In This Article:
The 2 Steps to Set Up Success
Want to test the platform first? Learn how to create a test client with these instructions.
To get started, we generally recommend that you do the following together:
- Add a client
- It's optional, but you can send an invitation link if you prefer! This invites them to create an account with a password and lets them know you use AdvicePay with your firm. (these last 30 days once sent- if they don't register. The link will remain in view, and you can send a new one!)
- Request a payment and send them the Invoice email and Notes (if applicable).
To add a new client and request payment together, start by going straight to:
Invoices > Create New or Subscriptions > Create New. Note that subscriptions are set for recurring billing after the first invoice is paid.
Click the + Add New Client link in the Client drop-down to invite your new client, then proceed to finish the payment request.
Choosing to publish without sending won't send to the client, but choosing Send an Email via AdvicePay will send it to the client right away.

How to Add a Client to AdvicePay
To add a client, you'll need to enter their name and email address!
Here's how:
1. Select the Accounts, then the Clients tab in your left sidebar
2. Click Add Client in the upper right-hand side of your screen

3. Enter your client's First Name, Last Name, and Email Address (they can update all of this information later in their account.) It is important to be sure the email is correct.
Select their Advisor (if available). You may also assign an optional, internal Client ID or Tag.
Optional: If you use Wealthbox, you can also copy/paste the client's Wealthbox link under the CRM Links tab. This will create a direct link to the client's Wealthbox page within the client's AdvicePay profile!

4. Click the Add Client button at the bottom. Your client is now added! When you request a payment, you can send them the invoice email notice, and they'll be able to pay and/or set up their account from there.
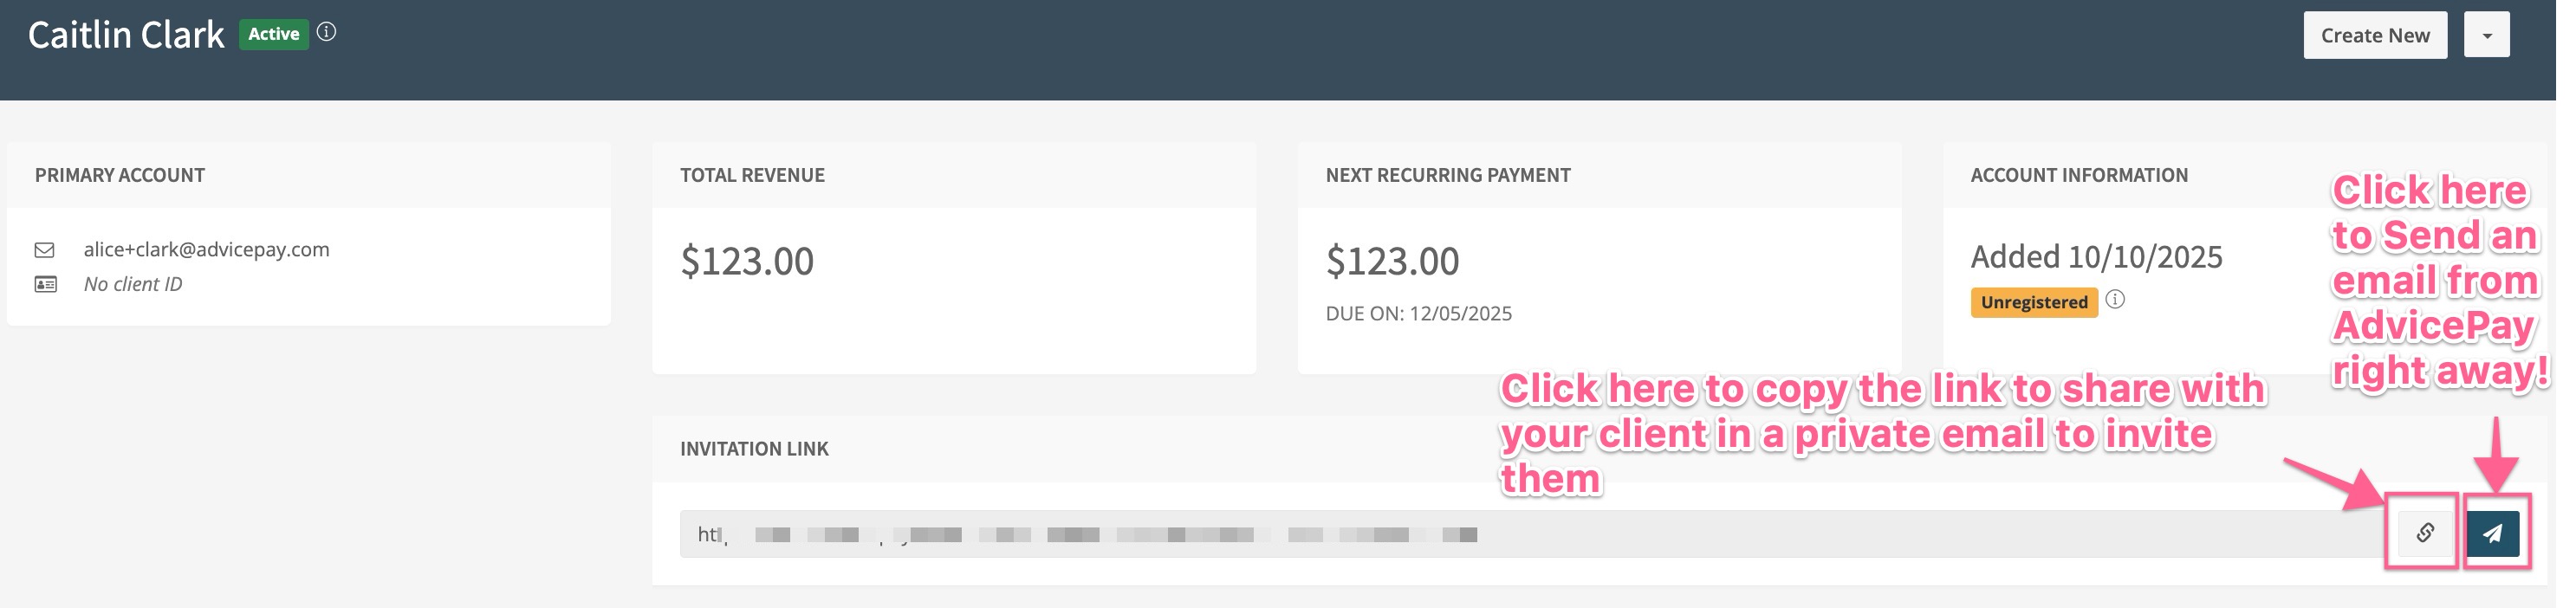
Alternatively, you can send over their unique Client Account Invitation link (located on their client page) so they can register their account separately. This will also allow them to access the account and pay an invoice or sign a document, among other things.
To do this, copy/paste the link and send it to them yourself in a private email, or click the paper airplane icon next to the invite link, and we'll send an email for you to the client.
See below for each option:
Did you know? Clients can pay without logging in, so they aren't required to register their an account. Find out more about how this works here!
Please note that all emails sent from AdvicePay come from info@app.advicepay.com.
Please ensure you and your clients add this to the safe sender list in your email provider or contacts to ensure everyone receives all emails to their main inbox.
How to Request a Payment
Want to learn more about Bulk invoicing? Learn more about how to request multiple one-time payments here.
If you'd like to issue a subscription payment request in the same step as issuing an up-front one-time payment, check further down in this article.
Let's get started:
1. Select the Invoices or Subscriptions tab in your sidebar
2. Click Create New in the upper right-hand corner of your screen
3. Select your Client (this is searchable by typing within the drop-down menu box) or add a new one.
4. (Optional) If your firm has an eSignature integration enabled and you want to attach a document for eSignature, click Add eSign Document and assign signers.
(*Please note that if you're on the Essential plan, this option won't be available to you.)

5. Select Attach Invoice
6. Select the following:
- Invoice Type (One-time or Subscription)
- Frequency, if you are setting up a monthly, quarterly, or semi-annual subscription
- Due Date or Start Date (a date on which you would like a subscription to begin billing).
- Optional: Select an end date for a subscription by setting the number of billing periods under + Add End Date. *(This feature is available on our Professional and Enterprise plans. On Essential accounts, subscriptions will bill indefinitely until you or the client cancels them.)
You can also adjust if a subscription reflects an invoice date range in advance or arrears.
Learn more about how to manage your default advance/arrears setting
By default, both Credit Card and ACH are selected as payment method options unless you have limited all payment methods in your Account Settings. To limit the invoice payment method to ACH only, check the ACH box and uncheck the Credit Card box.
7. Enter your Payment Amount, Description of Services, and Notes (if applicable).(How to enter a new service description.)
Optional: If creating a subscription, you have the option to add an automatic future Fee Escalation.
8. If notes are allowed/enabled at the firm level, Advisors can add notes to the invoice or subscription that are visible to their client. Next click Continue
- On the final screen, you can review the complete invoice details. When you're ready to send it to your client, click Finish!

Choose Send via email through AdvicePay if you'd like your client to instantly receive an email from AdvicePay inviting them to view the invoice, sign the contract (if applicable), and proceed to payment.
Choose Publish without sending an email if you don't want your client to receive an email from AdvicePay notifying them of the invoice and any attached contract. (This is a good option if you want to wait or let them know another way that they have an invoice to pay. You can copy/paste the provided URL, or here's how to send the invoice email through AdvicePay later!)
Advanced Payment Option for Subscriptions (Bundle a Subscription and a One-time Up-Front payment)
This option is available on Professional and Enterprise plans only. Please see more about our plans here.
This payment request method will allow you to request an up-front one-time invoice payment from your clients at the very same time as requesting a subscription payment. This allows you to charge an upfront fee on a subscription without needing to go back and create a separate one-time invoice. It also allows your client will pay in just one single step!
Once the client has authorized payment on the invoice, the one-time charge will be billed immediately(regardless of the due date), and the subscription won’t be billed until the due date you set.
To add a one-time up-front payment to your subscription invoices, follow steps 1-7 above. Then:
1. Click Add One-Time Invoice
2. Enter the Due Date, Payment Amount, and Description of Services, and notes (if applicable).
- Lastly, click continue and choose to Publish without Sending Email or Send Via Email through AdvicePay

Tip: The subscription invoice, as well as the one-time invoice attached to it, will appear under Subscriptions in your sidebar, as well as on the client's profile page.
If your firm allows scheduled invoices, check out this article on how to do this.
Frequently Asked Questions
Can I change the due date if the client wants it moved after the subscription has been activated and is already billing?
At this time, no, there isn't a way to edit an actively billing subscription due date, as it is set to follow the exact frequency and date assigned when it was established. If your client needs to change the due date in general, the subscription can be canceled and re-established as needed.